Wordpress to Antora Conversion
Posted : Blog Post : 25.11.2021 - North West Open Data
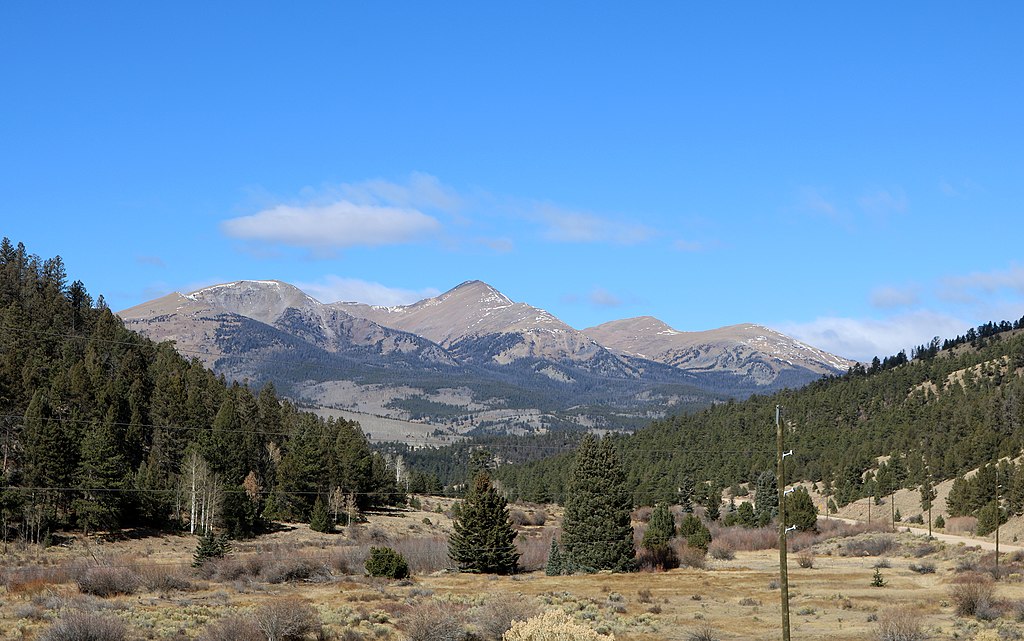
Antora Peak - 13,275 feet is located in Rio Grande National Forest, 4.6 miles west-northwest of the Town of Bonanza in Saguache County, Colorado, United States. - Wikipedia
1. Background
I started this project in January 2020 and initially set up a Wordpress(WP) site to document the learning process. I think WP is pretty good, it’s free, easy to install and use. It’s got hundreds of themes and plugins, it’s easy to manage, relatively secure and commercially adaptable. With that said what’s my problem?
Well on reflection I don’t feel this is a blog, it’s an exploration of a problem, more like an obervational field notebook, where the 'observations' are suitable for a 'blog' style but there is not the space for the 'synthesis' articles and the continual reworking of the work.
There’s also an element of IT fundamentalism at play, the data source of a WP site is a MySQL database. I do not think a relational database is the best place to store text. I also thought the performance was slow, my WP database was likely to be running on a shared server this will impact the readers experience and to a certain extent the writering process. I found myself spending more time writing posts than doing what I enjoyed.
I like markdown languages, which are shorthand for html, they are easy to learn, fast to write in a bare bones text editor. I’ve used AsciiDoc for several years and AsciiDoctor in particular. It’s feature rich yet readable in it’s source but more importantly it’s ascii, the lingua franca of computing. I can take the pages between operating systems, store them in source code control systems and even write scripts to generate pages.
There’s a rich ecology developing around AsciiDoc, I had considered adopting 'Hugo' as a website platform but my background use of AsciiDoc finally nudged me in the direction of adopting Antora as my static website generator. I also realised Antora was feature rich documenation site generator and I would only be interested in a few of it’s features and would be looking to remove alot of the options available by default.
The following are some basic technical points and reminders to myself for working with Antora to create a static website. I would point out I am no expert in node, html, css or javascript in general. I read the Antora docs and did a bit of 'playing'
2. Installation
-
Quickstart Guide I would stop at 'Create a playbook' if you are new to Antora
-
If you want to make changes to the default UI or them you will need to install
gulp- See here for details.
After installation you need to understand the filesystem layout before you get
involved in setting up any .yml files
|
3. Configure Directories
A content source is a git repository, I think the minimal requirement is a git init
followed by a commit on a local filesystem. Once I had the structure complete and a few
pages written I committed/pushed to GitHub to test the full Antora build.
.
├── README.md                  (1)
├── antora.yml                 (2)
└── .git                       (3)
└── modules                    (4)
    ├── ROOT                   (5)
    │   ├── images
    │   │   ├── github.png
    │   │   ├── nwod.png
    │   │   ├── reddit.png
    │   │   └── twitter.png
    │   ├── pages
    │   │   └── index.adoc
    │   └── partials
    │       └── nav.adoc
    ├── blog                   (6)
    │   ├── images
    │   ├── pages
    │   │   ├── index.adoc
    │   └── partials
    │       ├── nav.adoc
    └── docs                   (7)
        ├── examples
        ├── images
        ├── pages
        │   ├── index.adoc
        └── partials
            └── nav.adoc
| 1 | The repo README file |
| 2 | The site’s antora.yml file |
| 3 | .git directory, subdirectories snipped |
| 4 | The modules directory is the top level of the sites content |
| 5 | The ROOT subdirectory - ROOT is a special key word that signifies a space for non specific files, this will become clearer when you see the output structure after running Antora. Basically I thought I would place my index page, privacy and T&C pages |
| 6 | The blog subdirectory |
| 7 | The docs sub directory |
In each 'ROOT', 'blog' and 'docs' directory I created some subdirectories. These were the locations of the content files, content types are described below. Not all are compulsory.
| Directory | Purpose | Access method |
|---|---|---|
attachments |
For files to download eg .tar, .zip etc |
AsciiDoc |
examples |
For source code, terminal output, .csv data sets |
AsciiDoc |
images |
For image files included in pages(.png,.jpg,.svg,.gif) |
AsciiDoc |
pages |
AsciiDoc files(.adoc) These are automatically converted to .html |
n/a |
partials |
AsciiDoc fragments eg a table or list to be included in multiple .adoc pages |
AsciiDoc |
4. The .yml Files
There are two key 'YAML' files. YAML files are basically config files for `antora', indentations are important but the format is quite simple(see here for details).
4.1. antora.yml
The antora.yml is located in the root level of the repository, it signals to
Antora the modules directory it also signals the version metadata
Here’s my initial antora.yml
name: nwod                           (1)
title: Northwest Open Data           (2)
version: master                      (3)
nav:
- modules/ROOT/partials/nav.adoc     (4)
- modules/blog/partials/nav.adoc
- modules/docs/partials/nav.adoc
| 1 | Together with version uniquely identifies component version |
| 2 | Used in pages, version selector, breadcrumbs etc |
| 3 | Together with name uniquely identifies component version |
| 4 | Identifies Navigation Files(nav.adoc) - more on this later |
See here for futher information
4.2. antora-playbook.yml
This was my basic antora-playbook.yml
site:       (1)
  title: North West Open Data
  url: https://northwestopendata.org.uk

content:    (2)
  sources:
    - url: https://github.com/northwestopendata/nwod_www
      branches: main

ui:         (3)
  bundle:
    snapshot: true
    url: https://gitlab.com/antora/antora-ui-default/-/jobs/artifacts/HEAD/raw/build/ui-bundle.zip?job=bundle-stable
| 1 | This is the site name and url of the website. See When should the site URL be set? |
| 2 | This defines where the content can be found, in this case GitHub, but it could be a local directory. See Transferring the Content for a local directory example. |
| 3 | This is the UI or the theme to use. Antora splits content from theme. |
5. Building
You can then generate a website by running antora from the command line
antora antora-playbook.yml
A local directory was created called build containing the generated html files, images and
in the _ directory the css, fonts, javascript etc required
.
└── site
    ├── 404.html
    ├── _
    │   ├── css
    │   │   └── site.css
    │   ├── font
    │   │   └── roboto-mono-*               # content snipped
    │   ├── img
    │   │   └──                             # content snipped
    │   └── js
    │       ├── site.js
    │       └── vendor
    │           └── highlight.js
    ├── index.html
    ├── nwod
    │   ├── _images
    │   ├── blog
    │   │   ├── _images
    │   │   ├── index.html
    │   ├── docs
    │   │   ├── _images
    │   │   ├── index.html
    │   └── index.html
    ├── robots.txt
    └── sitemap.xml
6. The Default Output
After generating, open the index.html page in a browser to view the default structure of the generated website.
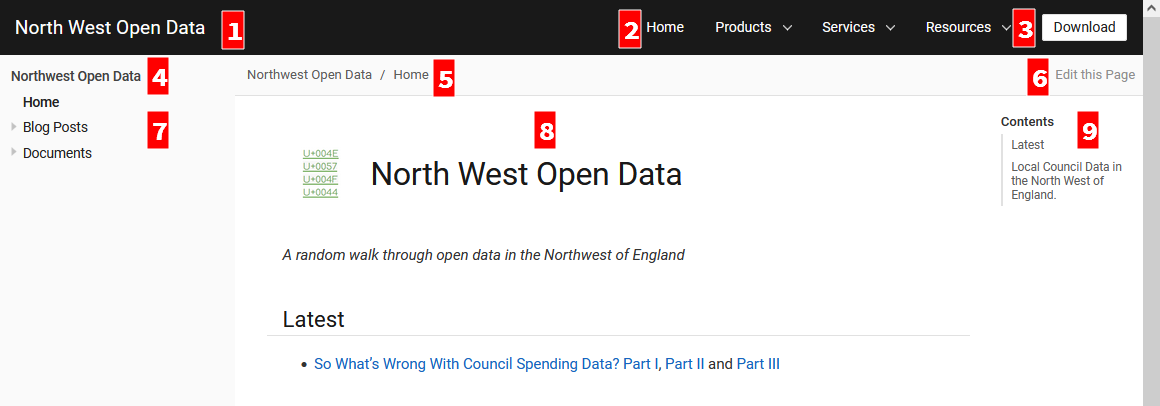
-
The site name (site: title)
-
Default navigation features, links and drop downs
-
A download button for the page
-
The site name (site: title) again
-
The breadcrumb location
-
This allows editing of the file on GitHub
-
The site navigation, created with nav.adoc files(antora.yml)
-
The web page
-
The table of contents(toc) for the page
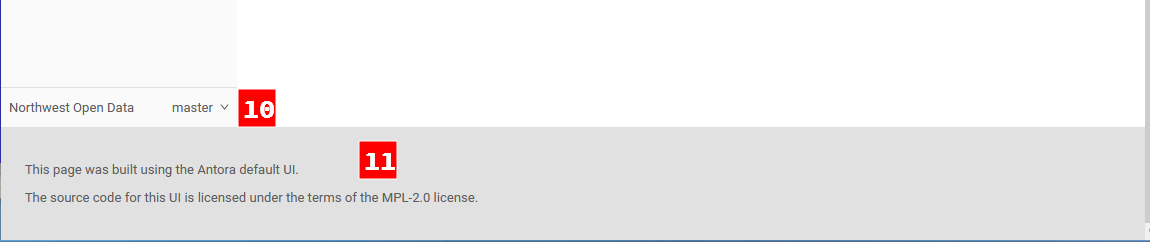
-
The version navigation widget
-
The page footer
For the time being I was quite pleased with the results but Antora is designed for working with multiversion documentation content. I was going to have to simplify some of the features as my requirements for a basic website did not require alot of the features on Antora.
7. Transferring the Content
Rather than pushing and pulling from GitHub - I decided to set up a local working environment as suggested in the documentation. So I created a directory and located the following within it.
-
nwod_wwwwhich contained the content repo -
cachedirectory, I seemed to experience problems when generating the site where changes weren’t picked up. I didn’t really get to the bottom of the problem but I wrote a small shell script to build the site where I deleted and recreated the cache area each time. -
build.sha simple shell script to run antora with either the local or site playbook -
antora_ui_defaultthis contains the original source code extracted from the ui-bundle.zip. -
ui-bundle.zipitself located at the top level -
I also created a couple of
playbook.ymlfiles:-
antora-local-playbook.ymlwhere the content and ui values are
-
	content:
	  sources:
	    - url: ./nwod_www       (1)
	      branches: HEAD        (2)

	ui:
	  bundle:
	    snapshot: true
	    url: ./ui-bundle.zip    (3)
| 1 | Use the local repo directory |
| 2 | HEAD is a special keyword to signify a local files repo |
| 3 | Use the local zip file to theme the website
|
	content:
	  sources:
	    - url: https://github.com/northwestopendata/nwod_www  (1)
	      branches: main
	      edit_url: false                                     (2)
| 1 | Alway build the website from the GitHub repo |
| 2 | Turn off the 'Edit this Page' button (see item 6 The Default Output) |
Then it was just a matter of transferring the Wordpress web pages via cut and paste into .adoc files in vi. Download and save any images I had to and recreate some charts that were originally made by custom plugins, it took me a couple of weekends and the odd hour midweek. It also gave me a chance to correct spelling mistakes and add some updates for any parts that had changed.
8. Theming with the UI
One of the things I liked about Antora is that working with the content is cleanly seperated from the look and feel, theme or in Antora speak the 'UI' of the website
| For quick minor changes to the UI it may be better to look at supplemental files . A good example is at Lightbend |
8.1. The Default UI
Changing the default UI is well documented
I cloned the default repo, you need that to make changes, you can not use the ui-bundle.zip
git clone https://gitlab.com/antora/antora-ui-default
.
├── docs
│   └── modules
│       └── ROOT
│           └── pages
├── gulp.d                     (1)
│   ├── lib
│   └── tasks
├── preview-src
└── src                        (2)
    ├── css
    ├── helpers
    ├── img
    ├── js
    │   └── vendor
    ├── layouts
    └── partials
| 1 | You will need to download gulp as mentioned in Installation |
| 2 | The src directory contains the css files and the partials which control the appearance of the generated website |
8.2. Using gulp
-
Change directory to the antora-ui-default directory
-
Run
gulp previewwhich will start a local sever on http://localhost:5252 -
You can open the url in a browser
-
You are now ready to edit the
partial.hbsor the*.cssfiles to make changes -
When you have finished Ctrl + C to stop the preview session
-
Then run
gulp bundlethis will create the new zip file inantora-ui-default/build. It will also check for errors in the css files -
Copy the ui-bundle.zip to the location required in your
antora-playbook.ymlto run antora and generate with changes
8.3. Page Layout
The layout of the page is controlled by files in src/layouts and the
src/partials define the parts of the page with html and moustached values
that are holding spaces for paths or Antora attributes
Some of the key .hbs partial files are highlighted below.


8.3.1. Page/html Changes
-
Changed
header-contents.hbsto add an image and to remove unwanted items, I decided on a simple 'Home' link and a dropdown to other areas of the site. Currently Blog and Documents under a Navigation item -
The Site name is picked up from the
antora.yml -
The 'Edit this Page' button is quite useful for working on the local version for fixing minor issues but I did not want that appearing on the website.
-
The
footer.content.hbsis the easiest file to work with, I added some links to social media, kept but expanded info regarding website generation and added © statement and a url for the current page -
Add links to Terms and Privacy pages
-
I wanted to remove the default version selector from the page, I did this by commenting out the entire contents of the
nav-explore.hbsfile -
Working with the 'Handlebar Template' files is documented here. I did find some of them quite confusing. At one point I created a table in the
footer-content.hbsfile with all the values in and could see them change as I navigated around the site.
<table>
<tr>
    <th>site.url</th>
    <th>{{{site.url}}}</th>
</tr>
.........
<tr>
    <th>uiRootPath</th>
    <th>{{{uiRootPath}}}</th>
</tr>
</table>
-
Add a favicon image to
src/imgdirectory and added the icon link tohead-meta.hbs
8.4. CSS Changes
-
Header background text colour -
--navbar-font-colorto#52de16invars.css -
The table headers did not seem to be working so I added the following to doc.css
.doc th {
  background: var(--code-background);
}
-
Some text decorations seemed to be missing, overline was one I noticed so added that to doc.css
.doc .overline {
  text-decoration: overline;
}
-
The
collapsibleaction did not work but I will look at that later
8.4.1. Asciidoctor Global Attributes
AsciiDoc attributes are usually defined on a per document level but with Antora these can be defined in the antora-playbook.yml file. They can be hard or soft set, allowing for overiding at the page level.
I added the following to my playbook files
asciidoc:
  attributes:
    author: North West Open Data
    toclevels: '3'
    experimental: ''
    numbered: ''
    source-highlighter: highlight.js
Extensions can also be configured at this level
8.4.2. Asciidoctor Page Attributes
For the blog posts I defined the revdate, revremark, description and keywords. These are
defined at the top of the page, directly below the 'Header 1' line.
| Do not leave a space between the title and the first attribute declaration |
= Wordpress to Antora Conversion                                         (1)
:revdate: 25.11.2021                                                     (2)
:revremark: Blog Post                                                    (3)
:description: Some notes on converting this website \                    (4)
from Wordpress to AsciiDoc and Antora
:keywords: asciidoc, asciidoctor,antora,wordpress, migration,convertion  (5)

_Posted : {revremark} : {revdate} - {author}_                            (6)
| 1 | Document Title(Level 0) for this page, will be expanded as page title in an un named xref link Wordpress to Antora Conversion |
| 2 | Date of blog post |
| 3 | Type of page |
| 4 | Description of document, split multilines with \ - backslash |
| 5 | Key words for web search engines |
| 6 | The first line of a blog post uses the above attributes "Posted : Blog Post : 25.11.2021 - North West Open Data" |
9. Conclusions
Once I had changed the above I wrote a shell script that would build two types of sites, local and one for the web as well as run the UI build.
When I want to update the website I just transfer a tar file to the webserver and unpack it.
The website proved to be fast and responsive and fullfilled my basic requirements
I now have all my posts in asciidoctor in GitHub and I have the ui file in a repo as well
There are a few outstanding issue I’ll be looking at
-
Customise 404.html
-
Come up test document to compare Asciidoctor vs Antora output as I think some asciidoc directives do not work in Antora
-
Review the changes I have made to see if I have done them in the best way, I suspect I could have done things differently but I was just learning about Antora at the time.